Saturday, December 7, 2013

Lit Paper Mache Letters

While cruising around Pinterest a few weeks ago I came across this picture:


I loved the idea of lit paper mache lettering!  There are so many different things you can do with them, aside from a Christmas theme.

I decided to use the "JOY" word because it was short and I thought it would be easier than a word with more letters.

As mentioned in the blog's directions, the woman had special ordered the larger letters, however at Hobby Lobby they only had the smaller letters.


I grabbed a few other things...silver spray paint, glitter spray paint, and lights.  I ended up returning the glitter spray paint because it didn't work.  A clear spray came out, but not with the glitter.


The first thing I did was use an exacto knife to cut around the lettering to expose the inside.


Once the letters were open I used a pencil to mark where the lights would go.

I sprayed three coats of silver on the letters and used some Modge Podge, a paintbrush, and a super fine silver glitter to cover the lettering.


The next step was to take a sharp tool and make a hole where the penciled dots were.  Not sure if it would have been better to poke the holes before or after spray painting and glittering.

The string of lights had 100 lights.  I found the middle of the string of lights, and started poking the lights through the middle of the letter O.  From there I worked outward to that it was spaced evenly.  It wasn't the easiest thing to do and it was at this point I realized why larger letters are probably easier to work with...less cord bunching.


Some of the lights were falling out of the holes so I tried to hot glue them in, but that didn't work too well.


I played around with the lights and letters for a while and finally had it all figured out.  In the meantime I put the mantle together and got everything in place.


Sunday, November 24, 2013

Simple Place Cards

Table is decorated and votives are made.  Next up, place cards.

These place cards were just about the easiest and quickest things I've made in a while.  Yesterday at Michael's while I was getting things for the votives, I grabbed some miniature clothespins for $2.00.

At home, I pulled out my box of old buttons and a glue gun.  While the glue gun was warming up I created some place cards on Microsoft Word.

While the place cards were printing I hot glued one of the ends to each button.  I left one unglued so that I could slightly press and open the clothespin.


Saturday, November 23, 2013

Table Votives

Let it be known that I haven't forgotten about my dear ol' blog.  It's been since September 9th that I've put up a post.  Whoa!  With working, two kids in sports, and everything else, I rarely have time to devote to completing projects.  

However, now that I am rolling into Thanksgiving vacation I actually have some free time.  My husband and I are hosting Thanksgiving this year.  There will be a total of 10 of us.  We usually travel on Thanksgiving so I am one, looking forward to not being on the road and two, getting the table decorated for our guests.

I thought it would be nice to have a votive at each person's place setting.  I had pictured small glass votive holders covered partially with glitter.

I found the materials today at Michael's.  

Let's start with the votives, that come in a package of 16, for $8.99 (but I used my app coupon and got them for 50% off...only $4.50.)


I also picked up some glitter for $2.99.


Then I gathered my materials.


I decided that with 10 votives, I would create 5 different designs....two of each.  I simply taped off the votive, brushed on the glue, and sprinkled the glitter.


Here's what they looked like once I peeled off the tape.


Yes...they are on the mantel because I don't have my table decorations set up yet....
 

Monday, September 9, 2013

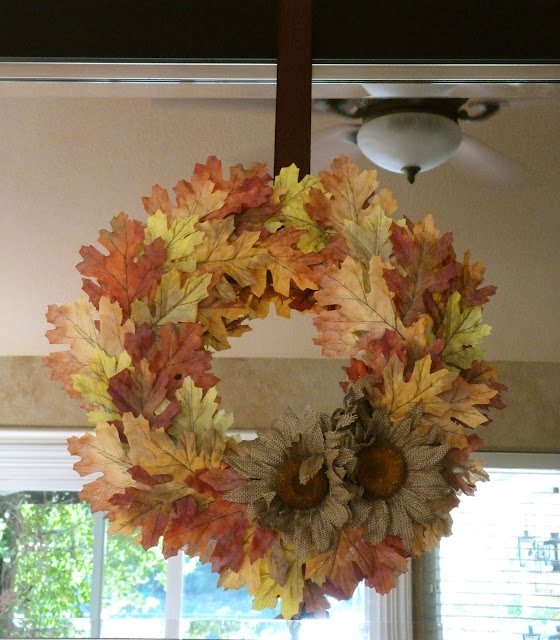
Another Fall Wreath

I regularly hang a wreath from the mirror above our family room mantel.  I sometimes change it up for holidays.

For quite a while I've had a wreath covered in bright green Spanish moss hanging (sorry, I don't have a picture.)  It's simple.  It's neutral....but, it was time for a change with fall/autumn just around the corner.

I dropped in to Hobby Lobby and purchased this...a bunch of fall stuff.  And can I say that I finally was ready to buy fall merchandise?  I hated going in there the end of June and seeing fall and Christmas stuff.


I started with wrapping the wreath with the burlap.  Then I glued on the 3 flowers.  It was simple and nice, but not complete.  I then started gluing some leaves around the flowers.  Better, but still not enough.  I ended up gluing leaves over the entire front surface of the wreath.  Now complete!


Monday, July 1, 2013

Spiced up Spice Rack

Last month I posted a picture of this spice rack I stumbled across in one of my regular thrift stores for $4.50.


The painting possibilities were endless.  I didn't know where to start.  I felt like I would be overwhelmed by color combinations if I went paint shopping at a retail store.  Instead, I went paint "shopping" in my garage cabinets.  I decided on a dark brown, a creamy white, a turquoise spray paint, and a silver acrylic paint.

The entire spice rack is put together with very small nails, even the metal inserts.  It needed a bit of attention, so I took a small hammer and doctored (tightened) it all up.  I removed the yellow, metal inserts.  They didn't need to be nailed back in because they fit so snug in their place.
I started by painting the inside of the rack the creamy white.  It took 2 coats.  Then, I painted the outside brown, two coats again.  While I was waiting for the rack to dry, I spray painted the inserts.  Finally, I brushed some silver paint on the knobs.

All finished!

I don't know where I am going to hang the rack yet, so I opted to take some pictures of it outside on our patio mantel.


Monday, June 17, 2013

Oh the Possibilities

Look at this awesome spice rack I picked up today at one of my regular thrift stores.  I could not pass this one up.  At only $4.50 it was a must.


The entire thing is put together by tiny nails, which may be an issue for me.


I want to pop these yellow metal figures out and spray paint them, but they are....put in there with tiny nails.  I'll work with them though.
 

I won't use it as a spice rack, but probably instead as something to be hung in our living room or hallway.
 

Stay tuned...

Thursday, June 13, 2013

Thursday Thoughts

Ten Thoughts This Thursday

1.  I wish...we were going to Disneyland this summer.

2.  I want...Maroon 5's new CD.

3.  I think...summertime is more valuable now that I just finished my first time teaching full-time in seven years.

4.  I need...to wash down our kitchen cabinets.  Ugh...

5.  I appreciate...when my chickens are quiet in the mornings because they weren't today and woke me at 5:30am.

6.  I enjoy...watching So You Think You Can Dance (such a GREAT season.)

7.  I struggle...with getting things done unless they are on a "To Do" list.

8.  I feel...fortunate to have such great girl-friends.

9.  I recommend...Clarisonic.  My skin is cleaner and softer since using it.

10.  I hope...my summer break continues to go as slowly as this first week has.

Saturday, June 8, 2013

Distressed Mason Jars

It's day one of my SUMMER vacation and I'm not letting any grass grow under my feet.  I finally had time to craft today! Since going back to work full-time, I just don't have the free hours that I used to have.

My mantel gets a work out, especially starting in the fall and going through St. Patrick's Day.  After St. Patrick's Day there's not much change going on, and I'm okay with that.  However, now that I'm on summer break I wanted to change it up a bit.

I headed over to Pinterest and found this inspiration, which can be found at this website.


While I like the 5 jars and 5 different colors I opted for 3 jars in gradient colors.  Here are the materials I bought at Hobby Lobby.

Silk fern.  The retail price is $22, so I used my coupon on this item.


 Three acrylic paints


Mason jars

I started by painting on one coat.  Side note:  Start painting on the bottom (but not the very bottom) and move to the top.  I started from the top on my first one and it was a bit awkward.  With just one coat, the paint was a bit streaky so I added a second coat and it looked great.  Then, using the advice from the blog post I linked, I used a nail file to do the distressing.  Super easy!


I cut a few sprigs of the fern for each jar.  I had anticipated using more in each jar, but it was too much.


Here they are on the mantel, however my "new" mantel isn't complete.  I'll post pictures of that once it's finished.  I still have to hunt down a few finishing touches.