Sunday, February 26, 2012

"Lucky" Banner

Is St. Patrick's Day really only a few weeks away already?  I love St. Patrick's Day...not sure why, but I do.  I assume it's all the dorky green decor and the sign that spring is around the corner.

I've created a few different banners for different occasions and holidays over the months and thought St. Patrick's Day was an excuse for one more.  I wanted to incorporate the colors of the rainbow to my mantel this year.  After brainstorming awhile, I decided on a banner spelling out the word "L-U-C-K-Y" in red, gold, green, blue, and purple.

As always, I was off to Hobby Lobby where I picked up two different green colored felt squares (although I ended up just using one), wooden letters, ribbon, and glitter.  Also, the dark green felt I used was the kind that is thick and firm so that it would hold its shape.


I tried to print out a large clover to use as a tracer, but I couldn't get one large enough...so I just free-handed one instead.


After tracing and cutting 5 shamrocks, I glittered the letters using Modge Podge and a paintbrush. 


Once the glue was dry I hot glued the letters to the shamrocks.


Using a fat, somewhat dull needle, I sewed/laced the ribbon in and out of each shamrock.

The finished product.


More pictures of the banner and my St. Patrick's Day mantel.


Tuesday, February 21, 2012

Painted Cabinets

Okay..another new post using old pictures, before I actually had an official blog.

This time SPRAY painted cabinets.  Yes, you read right.  I spray painted our bathroom cabinets.  Not sure what gave me the idea, but I believe I read about it online and thought, what the heck.  I was on a mission to get rid of some more of the 1980's oak that our home was once full of.  Years ago, I had (slightly) sanded the cabinets and stained them a darker color.  It looked fine, but over the years the stain started to look a little worn.

On to the spray painting...you might think, who in their right mind would spray paint INSIDE the house, right?  Well, me.  

We started by taping off the surrounding area around the cabinets, knowing that spray paint travels in the air.  We also opened doors for fresh air, and windows...all of them.  After taking the cabinet doors off, there really wasn't much to be painted so the job went quickly.  After applying two coats, they were covered perfectly.

The final touch was to change out the hardware and voila...a finished job...and a cheap one, too.

Before:


After:
 

Thursday, February 16, 2012

Thursday Thoughts

Ten Thoughts This Thursday

1.  I wish...I could be a DJ in a nightclub for just one night.

2.  I want...permanent warmer weather--I'm done with winter.

3.  I think...Smash, NBC's new show, might be worth watching.

4.  I laugh...with my co-workers.

5.  I appreciate...birds chirping in the mornings because it tells me spring is around the corner.

6.  I enjoy...wine after the kiddos are in bed.  Ah, wonderful wine.

7.  I struggle...with saying no to chocolate.  Get it out of this house, pronto!

8.  I feel...fortunate that my son is having an experience with a travel baseball team.

9.  I recommend...getting your eyebrows waxed every now and again.  Ahh.....

10.  I hope...to get out dancing again in the next month or so.

Sunday, February 12, 2012

Candy Buffet

A project I am currently working on for an upcoming event is a Candy Buffet.  You know...something like this:


or this...


or even this...


There is something so inviting about a bunch of candy at your fingertips...bliss.

I started and ended my project this weekend.  It only took 2 days of shopping, painting, and gluing.

I made my rounds yesterday and today to our local thrift shops looking for candlesticks and glass bowls/jars (that are wide enough to put your hand in.)  I was able to find what I needed without a problem and spent about $15.00

Here are the different candlesticks I picked up, ready to be spray painted.  I first applied a primer (Rustoleum's 2X brand) and topped them with a white glossy spray paint, also Rustoleum brand.


Here are the glass containers.


...after a couple of coats of spray paint.

...and the two put together.


The glass jars are just placed on the candlesticks for now.  I will eventually use some E6000 glue to adhere them together.  The final touch will be the candy. 

The total cost for this project was about $25.00, which includes the candlesticks, the glass jars, and the 2 cans of spray paint.


Friday, February 10, 2012

Kids' Valentines

For the last, I don't know how many years, I have made my kids' Valentines cards for their exchanges.  I can't stand how incredibly cheap the ones in the store are nowadays.  I remember when I was in grade school, the cards used to be halfway decent.  Not so much anymore.

This year I decided to try something that is all over Blog Land...3D Valentines.

I started by taking a picture of my daughter holding her fist out like she had something in it.  I also took the picture standing up on a chair so it drew her eyes and arm upwards.  After uploading the picture to Picasa, I used Piknik to do some editing, such as the frame and text.


For my son, I went with a slightly different approach.  I had him look up like something was on his head.  Again I took this picture standing on a chair, however, I don't think it really made a difference.  I also did some editing with his picture as well.


I uploaded these 2 pictures to Walmart and had them completed overnight.  While I was there picking them up, I grabbed a bag of good ol' Dum Dum Pops.

With the use of an Exacto knife, I made a couple of slits in each picture and slid a sucker in each card.


3D Valentine's Day cards...quick and easy.

Friday, February 3, 2012

Guest Bathroom

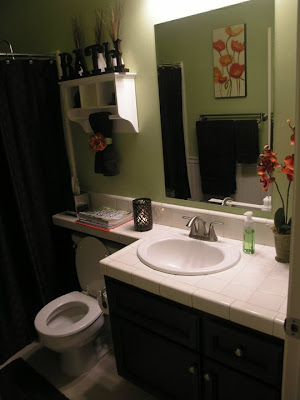
I'm bringing back another old project...our guest bathroom.  I love paint and the walls in our guest bathroom have been a handful of colors.  One year, after going to Vegas and staying at Bellagio, we were motivated by the colors of the bathroom there:  blue and brown. 

Our bathroom stayed that color (blue) until about a year ago when I needed a change.  It wasn't only the walls that I wanted to paint, but the cabinets as well.  Our house was built in 1986 so all of the wood was that "eighties oak."  Slowly but surely we have gotten rid of the oak.  Many years ago we painted the bathroom cabinets white, which has held up well.  

Here are a couple of "before" pictures.  You will notice that there is a section of green on the wall where I began painting and some cabinet fronts missing before I realized I needed to take a pic before painting the rest.


I can't remember what motivated me to change the wall color from blue to green, but I had visioned a celery color.  Then one day while I was walking through Home Goods I saw a Poppy canvas print which inspired me to have tangerine as an accent color.  With the green walls and tangerine accents, I thought brown cabinets would be best.  I primed the cabinets and put a few coats of brown on....love the change.  I added new hardware, knobs, faucet, light fixture, medicine cabinet, shower curtain, and towels.  

I present to you...the "after" pictures.


Thursday, February 2, 2012

Thursday Thoughts

Ten Thoughts This Thursday
1.  I wish...I enjoyed cooking more.

2.  I want...a spa day with an extra long massage.

3.  I think...Words with Friends is such a fun game.

4.  I laugh...at my son's "great" ideas--duct tape flip-flops???? 

5.  I appreciate...good friends.

6.  I enjoy...hearing my daughter say, "Good morning Mama" first thing in the morning.

7.  I struggle...with variety in our family meals (see #1 on this list.)

8.  I feel...sorry for some of the home lives my students to go to once school is out. ;(

9.  I recommend...sending someone a hand-written note. 

10.  I need...to get our tax stuff together and sent off.