This week the kids and I stopped by the local Hospice thrift store to drop off some donations. There is a drop spot out back, which is actually a room that is off to the side of the store where the donations are sorted through. I always use my eagle eyes to scan for potential projects, ones that haven't made it out to "the floor" yet, while the man takes my bags and writes me a receipt. This time nothing caught my eye...until we went into the thrift store.
This is what I found
A pile of crap? Well, that depends how you look at it. When I looked closer at the pile of crap stuff, I realized it was made of plastic and not metal. Still okay. Then when I looked under the candle holder I found these:
 |
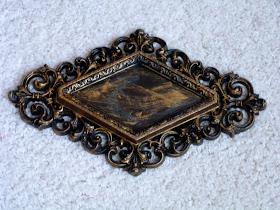
| Let's call these "Diamonds" |
So here's the best part. The pile of crap stuff was marked $3.00. I thought to myself, well even if this project doesn't work out, it didn't break the bank. The clerk rung me up and told me the grand total was $1.62. I questioned her and she told me that anything with a green tag is half off. SCORE!
I have been working on redecorating a wall in our front room, which you can read about here. I needed something to put on the right side of wall frame below and these would be perfect.
The first thing I did was place all four diamonds in warm water to soak off the butterfly prints. The paper was easily scraped off with a knife. I carefully peeled off one of the papers whole so I would have a pattern to use.
 | ||
| The butterfly paper and my pattern I made from scrapbook paper. |
 |
In order to ensure that the spray paint would stick I decided to prime them first. As for the color, I wasn't sure if I wanted to paint the diamonds a dark brown satin or metallic, so I bought a can of each. I ended up using Rustoleum's "Unique Hammered Finish" spray paint because I thought with the detail around the diamonds, they should resemble metal. Due to all of the nooks and crannies, it took quite a few coats of paint. I continued to spray here and there until the entire thing was covered and no primer was showing.
 |
| Not bad, right? |
My idea for the middle of the diamonds was to find 4 different pieces of scrapbook paper and put them inside. I shopped around at JoAnn's and found just what I needed. After tracing and cutting out the diamonds, I used Modge Podge to glue them on and was left this this finished product:
The next step was to play around with the different formations of the 4 diamonds on the wall. To do so, I roughly traced one of the diamonds on computer paper and then cut out 4 pieces. I taped them on the wall using painter's tape to see how the placement looked.
I ended up going with option #3. Here is the final outcome.
Oh, oh, oh...and as for the candle holder in the very first picture? I have plans to fix it up and use it with my Halloween decorations.
And might I'd add the cost breakdown of this project?
Candle holder and diamonds = $1.50
2 cans of spray paint = $8.00
Scrapbook paper = $1.00
TOTAL COST = $10.50
And might I'd add the cost breakdown of this project?
Candle holder and diamonds = $1.50
2 cans of spray paint = $8.00
Scrapbook paper = $1.00
TOTAL COST = $10.50


LOVE it! What a fun creative project! :) Thankd for sharing at DIY Thrifty Thursday 101.
ReplyDeleteMichelle
www.thrifty101.blogspot.com
Those diamond frames were a total SCORE! I love how they perfectly compliment the rest of your wall arrangement. Jen @ www.icantstopcrafting.blogspot.com
ReplyDeleteYou are so lucky to find those! They look great on your wall! A perfect add! Thanks for sharing!
ReplyDeleteKy
http://burstofcreations.blogspot.com/
absolutely stunning...
ReplyDeletethose are keepers baby !!!!!!
you should do a happy dance when ever you pass by these diamonds !!!!!
hugs.